
How Do You Use A Double Action Airbrush
A double action airbrush works by pressing down on the trigger to get airflow through the airbrush and then pulling back on the trigger to introduce paint into the airflow – the more you pull back on the trigger the greater the amount of paint that sprays.
If this seems a little confusing to you let’s do a quick overview of the double action airbrush before diving into the instructions on how to use one…
What Is A Double Action Airbrush
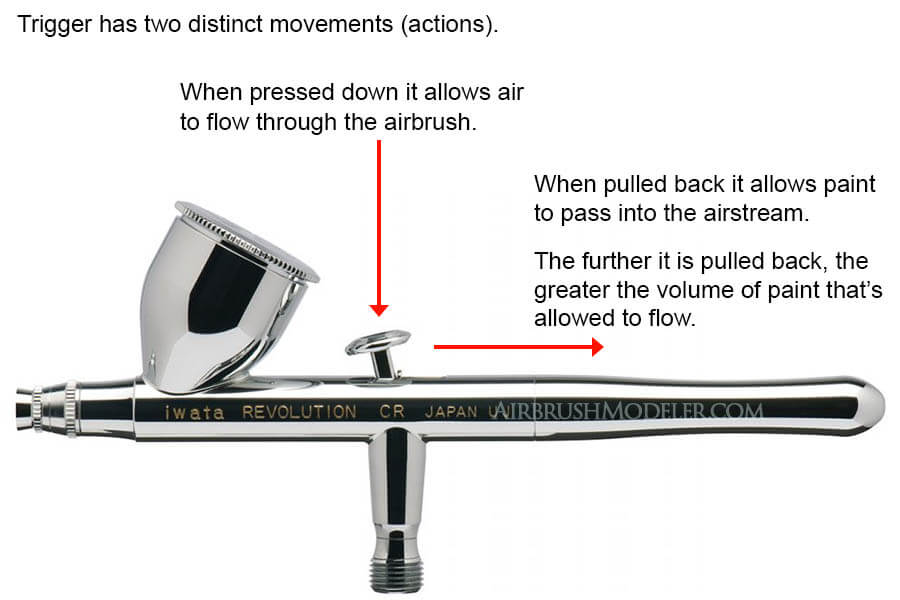
A double action, or dual action, airbrush, is one in which the trigger moves in two distinct ways and manages both the airflow and the amount of paint being sprayed through direct inputs by the user.
This is in contrast to a single action airbrush where the trigger only moves directly down when pressed, and this allows air to pass through the airbrush dragging paint along with it to be sprayed out of the nozzle.
👍 For an in-depth look at the differences between a single action and double action airbrush, including how to choose which would be best for you personally, check out this article.
The term ‘double action’ refers only to the trigger assembly and movement, otherwise the airbrush can be the gravity, siphon or side feed type.
While it doesn’t change how you use the airbrush during spraying, a double action airbrush will always be an internal mix airbrush with the paint and high pressure airflow mixing inside the airbrush body.
Ok, let’s get down to the nuts and bolts of how to use a double action, or dual action, airbrush…
How To Use A Dual Action Airbrush
To use a double action, or dual action, airbrush, it requires user input on a two-direction trigger to manipulate the air and paint flow separately.
Let’s look at each movement, or action of the trigger in detail, and understand how it can affect and improve your airbrushing.
Double Action Airbrush Trigger Movement 1: AIRFLOW
The first movement of the trigger on a double action airbrush is to press straight down, and this allows the high pressure air from the compressor to flow through the airbrush and out of the nozzle.
It should be noted that the air pressure and flow rate is not regulated by how far down you push the trigger, but rather by what air pressure setting you set on your compressor.
If you want less pressure do not try to push the airbrush trigger down less, simply wind down the pressure on the regulator attached to your compressor.
👍 If your airbrush compressor doesn’t have a regulator and you’re limited in changing how much pressure it delivers, you’ll likely need to upgrade your compressor and get absolutely everything you need to know about what to look for when buying a new airbrush compressor here.
So in practise, set the air pressure you want on your compressor, and with regards to the double action airbrush simply push the trigger all the way down every time to get the high pressure air flowing.
Now comes the part where the learning curve gets a little steeper, regulator the paint flow with the second trigger action…
Double Action Airbrush Trigger Movement 2: PAINTFLOW
Pulling back on the trigger of a double action airbrush allows paint to flow into the high pressure airstream, with the distance the trigger is pulled regulating how much paint is allowed to flow.
If you pull back just a little on the trigger it will allow a very tiny amount of paint to flow into the airstream, which can be helpful for getting in close to your work and painting very fine detail with excellent control.
If you pull back all the way on the trigger the airbrush will allow the maximum amount of paint to flow into the high pressure airstream and you will get a much greater volume of paint flowing, which is excellent for airbrushing larger areas with ease.
In the real world, however, you’ll often want to change the amount of paint you’re spraying with on the fly.
If you’re trying to get certain special paint effects or have an odd shaped item you’re painting it becomes extremely helpful if you can switch instantly and effortlessly between a little and a lot of paint flow, as not every aspect of what you’re painting will require the same volume of paint to hit the surface
As you can see, the double action airbrush is extremely versatile and will allow you achieve an excellent finish on even slightly more complex jobs with much more ease than you could achieve using a single action airbrush.
In contrast to the double action airbrush, the single action can only regulate the amount of paint by adjusting the air pressure on your compressor, assuming you have a compressor with a regulator that allows air pressure adjustments.
So now that you have a better theoretical understanding of how a double action airbrush works let’s look at how to practise with one in a practical sense…
How To Practise Using A Double Action Airbrush
It’s best to practise and learn using a double action airbrush by playing around with the trigger mechanism on something cheap and disposable such as a plastic container lid, a plastic spoon, or an old scrap model kit, rather than learn and make mistakes on a prize artwork or model build.
I’m going to use a piece of copy paper attached to a clipboard because it’s something most people will have access to.
NOTE: if you plan on painting something like scale models where there surface is not porous like it is on a piece of paper, be aware that the finish on paper will be slightly different to that on non-porous plastic. It’s worth also practising on something non-porous like a plastic lid or container if you can get your hands on one.
With all of this in mind let’s start from the beginning on some very basic steps to simply get you familiar with a double action airbrush.
It’s beyond the scope of a single article to get too in-depth, however you’ll get enough from the steps below to know how the airbrush works and to make a start on whatever it is you want to create or paint. 👍
INSTRUCTIONS
Step 1: Load Suitably Thinned Paint
Start by loading paint into your airbrush that’s been suitably thinned.
If you’re unsure on how to thin your paints at this point start your practise with some pre-thinned airbrush-ready paint.
👍 Alternatively, for instructions on how to perfectly thin your paints for airbrushing check out this detailed article.
If you have a source of compressed air with a pressure regulator on it set the pressure to 20 psi.
Step 2: Press The Trigger For Air Only
Push the trigger down to get a flow of air moving so that you can experience what it feels and sounds like.
Do not pull the trigger back for paint yet, simply run the airbrush across the paper or surface you’re painting on at different distances to see how it feels when the air hits it.
After a short while of doing this move on to Step 3…
Step 3: Initial Test With Paint

Start by pushing the trigger down to get the air flowing and begin moving the airbrush across the page from side to side and down with deliberate strokes with the airbrush about four inches from the surface.
As you start to move the airbrush pull the trigger back as far as you want to get some paint flowing and simply watch what happens.
Once you’ve completed a few side to side passes, pull the trigger to the full open position and continue on down the page or surface.
What you’re aiming to do is learn how the airbrush paints a surface when the paint trigger is fully open.
Once you made a number of passes with the maximum flow of paint coming out move on to the next step.
You may need to refill your airbrush with paint first as the maximum paint flow of an airbrush can cause you to use a lot of paint quickly.
Step 4: Test Close To The Surface With Minimal Paint
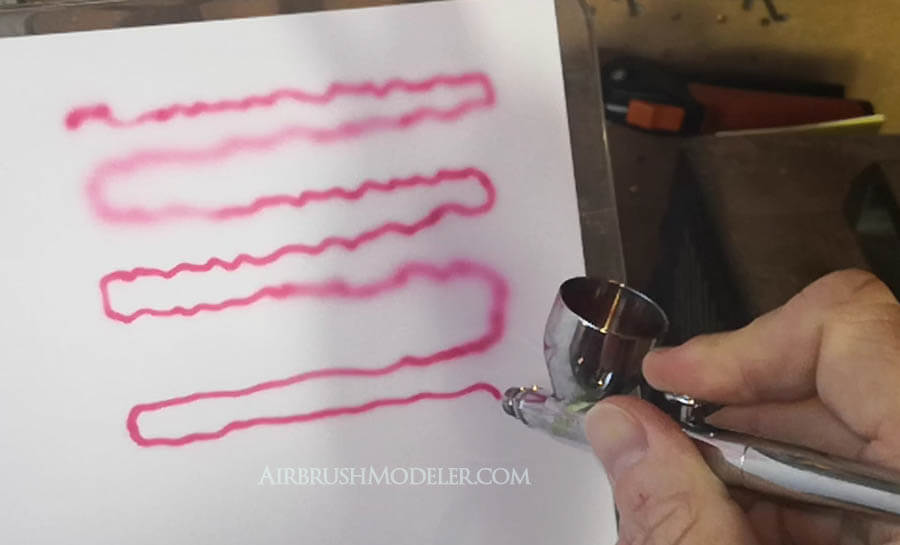
Now hold your airbrush half an inch to the surface of whatever you’re painting and press the trigger down to get air flowing.
Very slowly pull back on the trigger once the air is flowing until you get the smallest amount of paint possible mixing with the air and spraying onto your job.
When you see the paint hit the surface start moving the airbrush sideways or down and draw the finest line you possibly can.
You should also alternate moving the airbrush a little closer and a littler further away to see how the distance affects the line you’re painting.
You should see that the closer you go the finer and more crisp the line becomes, and vice-versa.
Do this for as long as you want to see how crisp and fine a line you can get, and then move on to Step 5…
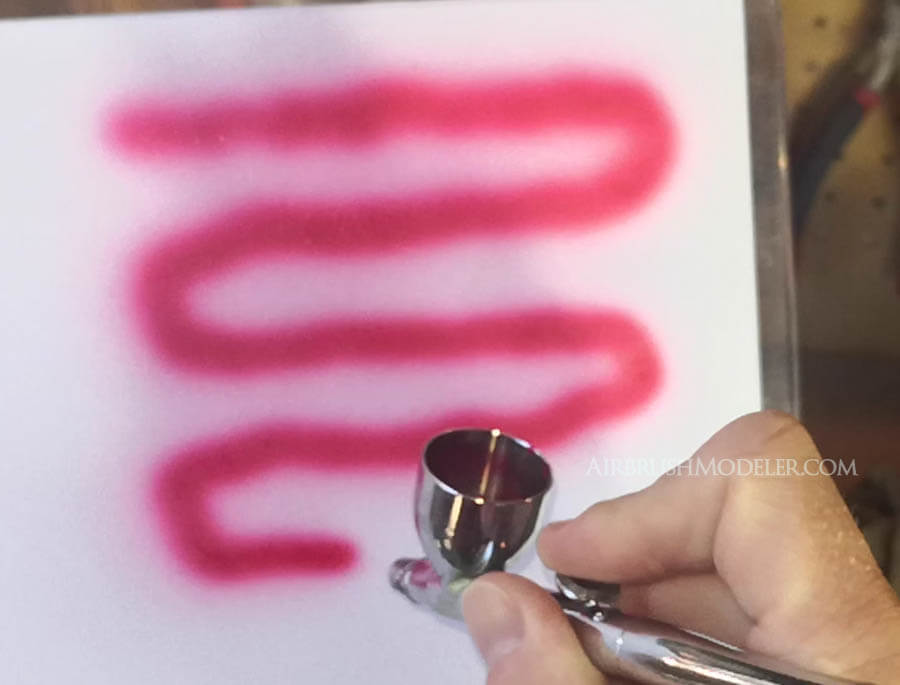
Step 5: Test Further Away With Medium Paint
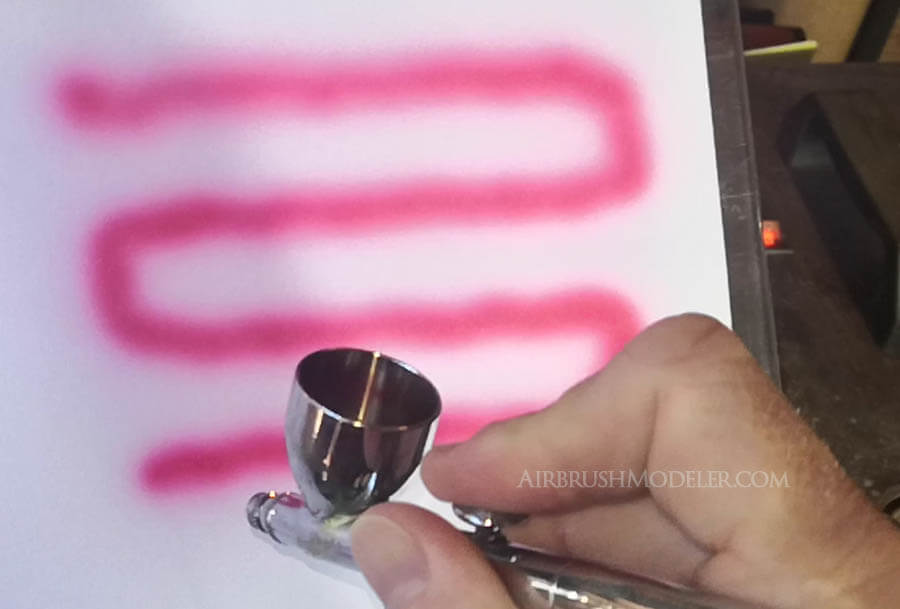
Now move the airbrush to approximately 3-4 inches away from the surface and press the trigger down to get air flowing.
As you then start to move your hand from side to side pull the trigger back through half its range of motion to get a medium amount of paint to spray onto the surface.
Regulate how fast you move your hand so that you get a good coverage of paint, but not so much that it starts to pool or run.
Step 6: Intentionally Make The Paint Run
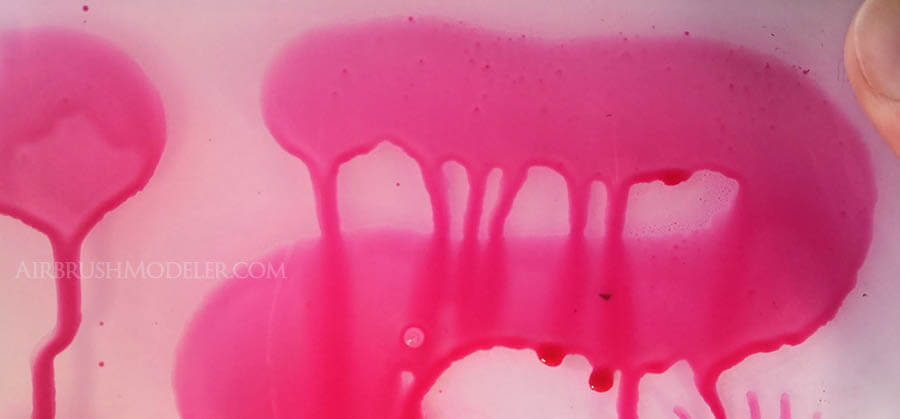
In this step you’re going to experience what it’s like to get paint runs and pools in your work.
Doing this intentionally on a practise surface will give you the knowledge and skill you need to identify when it’s about to happen on your important projects and avoid it entirely.
Hold your airbrush an inch from the surface and press the trigger to get air flowing.
Start moving your hand very slowing sideways and pull the trigger back all the way to get the maximum amount of paint flowing.
You should see the paint build up very quickly on the surface and run down the page, and you might also get spidering which is when paint pools and the compressed air then makes it spread out like spiders legs.
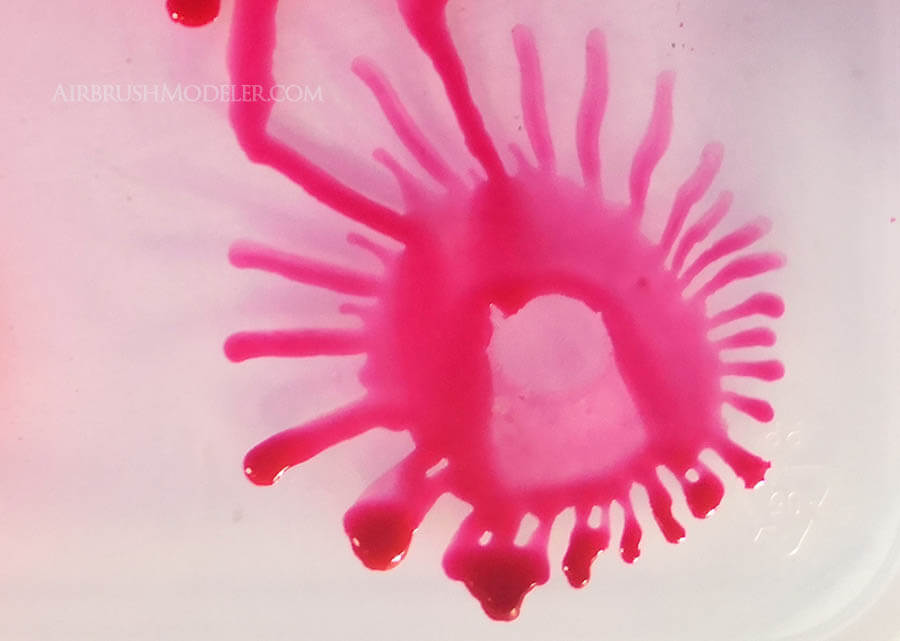
NOTE: If you’re using paper, which is reasonably absorbent, it will take more paint to force it to run, and unless your paint is fairly thin it may not run at all. Instead, what you’ll see is the paint pool and start to form waves as the air pressure pushes on the pooled paint.
If you’re using a hard non-porous surface like a plastic lid then it will run much more easily with less paint.
If you can’t get the paint to run then slow down the movement of the airbrush, or even stop it entirely to just watch what happens.
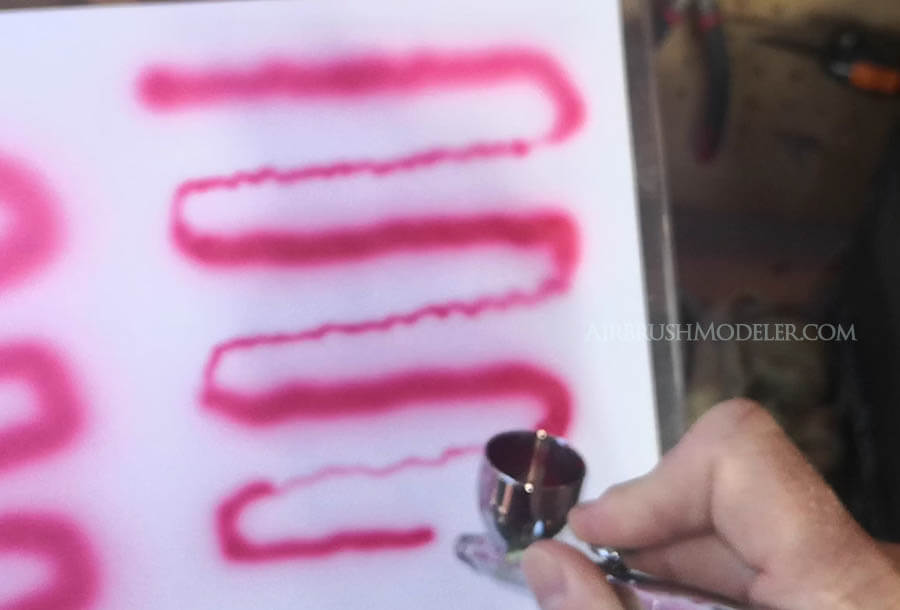
Step 7: Paint To The Point Of An ‘Almost-Run’
Airbrushing to the point where the paint almost runs is what you’re trying to achieve when painting a top coat on a scale model, for example, as it gives the very best and smoothest finish.
Start with your airbrush two to three inches from the surface and press the trigger down to get air flowing.
Moving your hand sideways pull the trigger back halfway to get paint flowing, and adjust the speed of your hand so that the paint goes down with good coverage to the point that it almost runs but not quite.
Feel free to pull the trigger back a little more to get more paint flowing if you need to, simply to speed the process up.
Keep practising doing more and more lines, or patches over the page, until you get it to the point that the paint actually does run a little, and then you know when you’ve gone too far.
Continue practising this step until you become proficient at it, which should take too long, then move on to Step 8… 👍
Step 8: Change Distance And Paint-Flow On The Fly
This step involved adjusting the distance from the surface and also the volume of paint flow on the fly.
The closer you are to the surface the less paint you want, and the further away the more paint you want.
You’re aiming to get an constant coverage of paint without having any parts being over thin or overly thick on the surface.
This can take a little practise but once you get good at it you’ll have some pretty good double action airbrushing skills! 👊
Start the air flowing first and hold the airbrush 2-3 inches from the surface.
Begin moving your hand sideways, backwards and forwards across the surface you’re painting on and also successively down.
As you start the first pass pull the trigger back as far as you did on the last step to get an ‘almost-run’ in your paint, and continue across the width of the page or surface.
As you move down to create a second horizontal line let the trigger move forwards about half its distance and shift the airbrush to around an inch from the surface while you continue to move it sideways, aiming to paint a thinner line but again achieving the ‘almost-run’ effect.
When you get to the next line down repeat the first portion again by pulling the trigger back further and also moving the airbrush to 2-3 inches away from the surface.
Repeat this process all the way down the page until it’s full and you have the hang of it, then move on to Step 9…
Step 9: Practise On A Colouring-In Print-out
This step will improve your airbrush position control, and also require you to practise using different amounts of paint at different distances from the surface in order to get accurate and quick coverage of certain areas.
In short, it involves using the airbrush to colour in a kids drawing which you can see below, and if you click on the image you can access a larger version of it to save or download and then print out.
The image was accessed at no charge from this website where you can get more pictures to practise on.
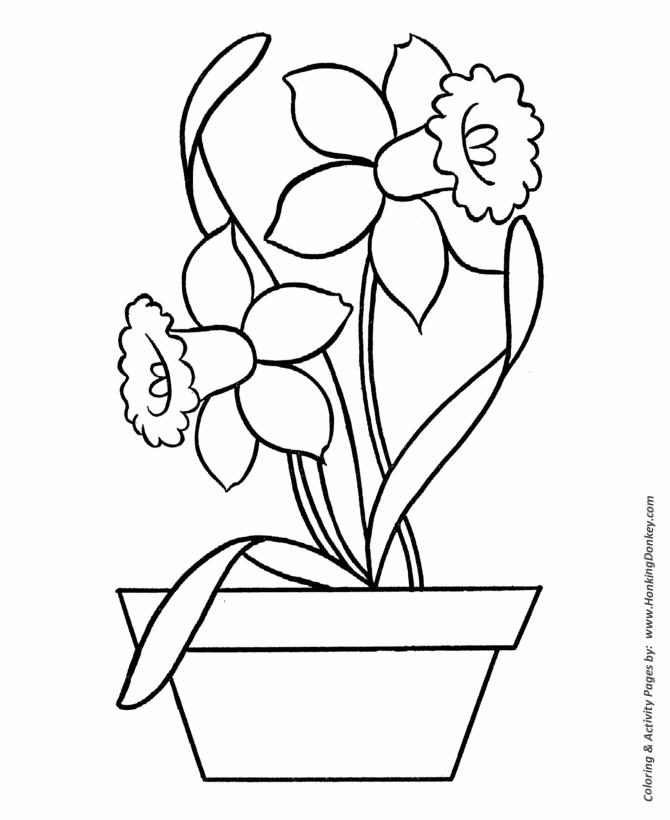
You can paint every section of the image the same colour if you want, however it may be beneficial to alternate colours between adjacent sections.
When you start on a section begin by having your airbrush very close to the surface and using a small amount of paint to get a crisp fine line around the edges of the section.
Once you’ve got good coverage on the section edges move the airbrush back and increase the paint flow so that you can cover the larger area in the middle without it taking forever.
Colour in the entire image and you’re done! 👊
Step 10: Continue Practising On More Challenging Colouring-In Print-Outs
Once you get good at colouring in the picture above you should advance onto more technical pictures that would suit an older child.
Again, visit this website to access free colouring in pictures to use your airbrush on and choose any ones that take your fancy! 👍
Final Thoughts On How To Use A Double Action Airbrush
Learning to use a double action airbrush has a slightly steeper learning curve than a single action airbrush, however if you break the process down into baby steps and master each one you’ll very quickly and significantly improve your double action airbrushing skills.
There’s no point delaying, grab a double action airbrush and get started and I think you’ll be pleasantly surprised at just how quickly you get good at it! 😎
Learn how to use a double action airbrush complete with step-by-step instructions, picture examples and downloads!
