
This is hands down the BEST method on planet Earth for getting paint from the spray can into your airbrush.
Getting paint from a can of spray paint into your airbrush really is as easy as using a specially cut straw to pass the paint from the spraycan nozzle into the mixing cup – it’s cheap, disposable, and extremely quick and easy to do, as you’ll see in the detailed step-by-step guide below.
Why Would You Want To Get Spray Paint Into An Airbrush Anyway…?
Sometimes you simply want more finesse to your spray-painting/airbrushing than a regular spray can allows, given the pressure that’s in some of those cans (usually a LOT!).
The volume of paint coming out of even a standard Tamiya spray can is significant and can sometimes drench small parts with far too much paint even if you’re being quite careful with your technique.
Or, you may simply wish to mix some colours together, etc.
Whatever the reason, there’ll inevitably come a time when you’ll need to somehow get the paint from the spray can into your airbrush, and if you don’t know a trick or two on how to achieve this it can leave you pulling your hair out.
Well you can take a deep breath, remove your hands from your head reeeal slow, and rest easy, because I’ve got damn near the perfect, cheap and simple solution for you!
Tools Needed To Decant Spray Paint Into An Airbrush
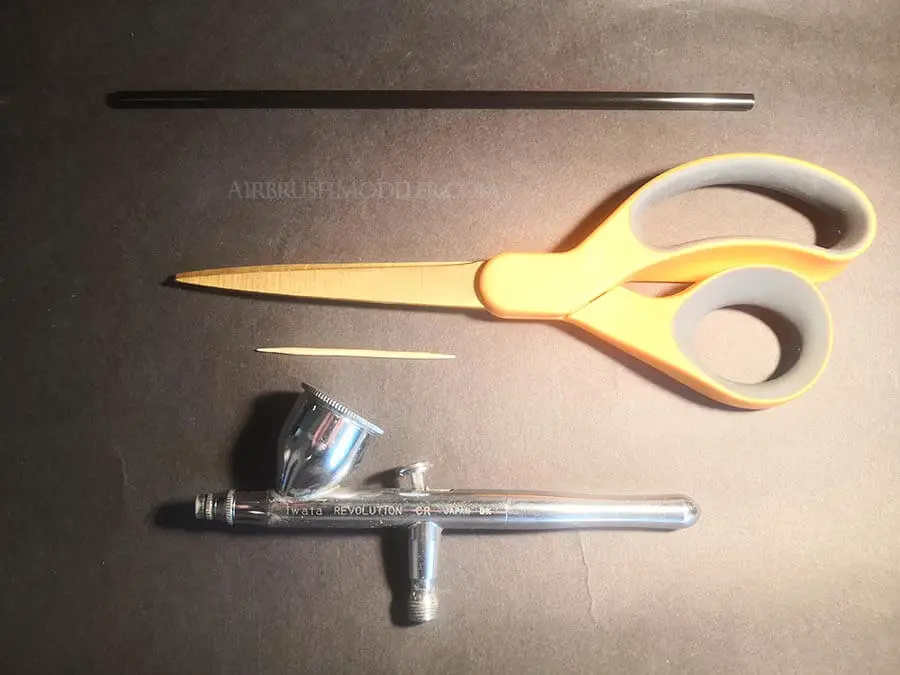
You’ll need the following items to get this task done:
- Your airbrush and can of spray paint… obviously;
- A regular plastic drinking straw (they’re stupid cheap and disposable);
- Scissors;
- Possibly a toothpick;
- Possibly a rag for clean-up;
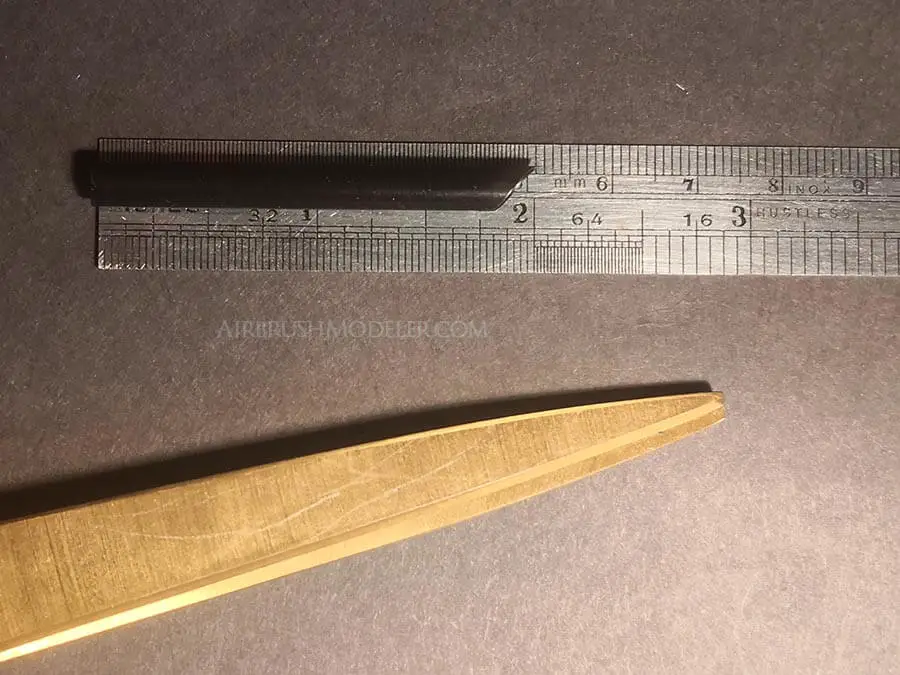
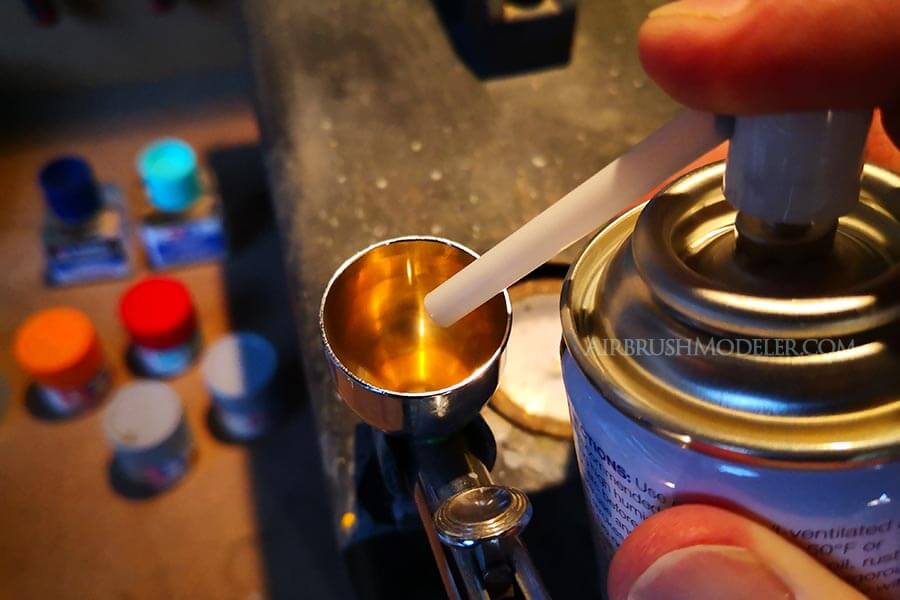
Step 1 – Prepare Your High-Tech Straw 😉
The first thing to do is prepare your straw as it’s the conduit that will transfer the paint from the spray can to the airbrush, HOWEVER… it’s not as simple as simply spraying into the straw…
I tried that at first, and the mess was obscene… 🙄🤬
There’s two reasons to cut the straw in a very specific way:
- You simply want the straw shorter, no more than two to three inches long. There’s no point spraying paint down a mile long straw as it will be harder to handle overall and will be wasteful with paint left inside the straw; and
- You want to cut one end of the shortened straw on an angle, and here’s why:
The straw may be too small to fit over the nozzle of the spray can.
For example, in the vast majority of straws I buy locally they’re not wide enough to fit over the nozzle of a Tamiya TS spray paint can.
The perfect solution to this is cut the end of the straw at a forty-five degree angle (or thereabouts).
Step 2 – Test Fit The Straw
Now it’s time to test fit the straw, as having cut one end at an angle will allow for two benefits:
- Having cut the end at an angle will effectively make the opening larger so that you can fully cover the nozzle completely with angled end of the straw, and
- Given you’ve got a suitable angle on the straw to fully cover the nozzle you can now point the straw downwards and directly into your airbrush, whether it’s a gravity feed or syphon feed type device!
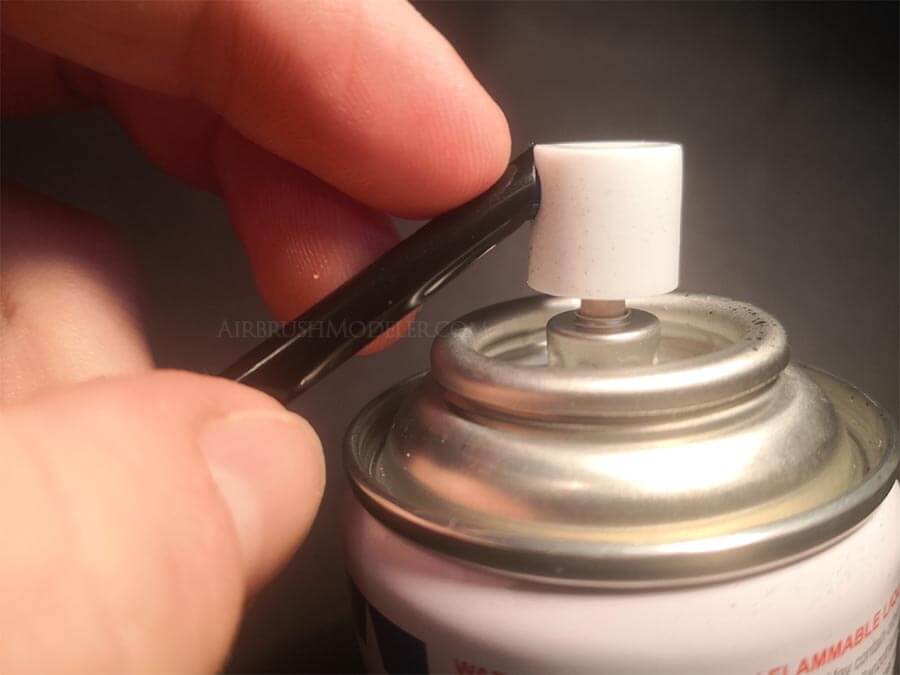
Having the straw angled downwards means that you can keep the can totally upright and allow for a consistent flow of paint and not get to a point where you’re only pumping out gas with no paint present (this happens more easily as the spray can contents gets less and less as you use up paint).
Step 3 – Give The Can A Shake As Usual
So, we’ve got our highly-technical-straw-decanting-device expertly manufactured 😎, we’ve figured out how to keep the can upright while decanting, next make sure to actually give the can a good shake just as you would if you were spraying directly from the can to the model or job.
Go ahead and give the can a good shake now.
Step 4 – Decant The Paint Using The Specially Cut Straw
It’s finally time to get the paint flowing…
I find it easiest to use one pointer finger to hold the top of the straw over the nozzle, and the second pointer finger (of the hand that’s holding the can) to actually press down on the sprayer to get the paint flowing.
This allows for the best ‘seal’ of the straw over the nozzle (although it might not always be perfect and it’s not uncommon to have a little clean up).
Hold the can next to your airbrush or bottle, seal the straw over the end of the spray can nozzle and have the bottom of the straw pointing into the item you want to fill, and firmly press down on the spray can trigger while keeping a decent hold on the straw over the nozzle.
You don’t want to press super hard on the straw to keep it sealed or you might stop the paint from actually going down the straw and it will squirt under high pressure out of all the gaps and make quite a mess.
In this case practise makes perfect and you’re best testing it on a disposable cup or small glass paint mixing jar first, somewhere that you can make quite a mess while you’re testing it out.
In all likelihood though you won’t really run into many problems as this method is quite forgiving.
It’s important that you keep an eye on just how much paint is going into your airbrush or bottle.
Some gravity feed airbrush cups are quite small and will fill up extremely quickly and you don’t want the paint to overflow.
Which brings us to the next points…
Step 5 – Let The Decanted Pain Gas Out
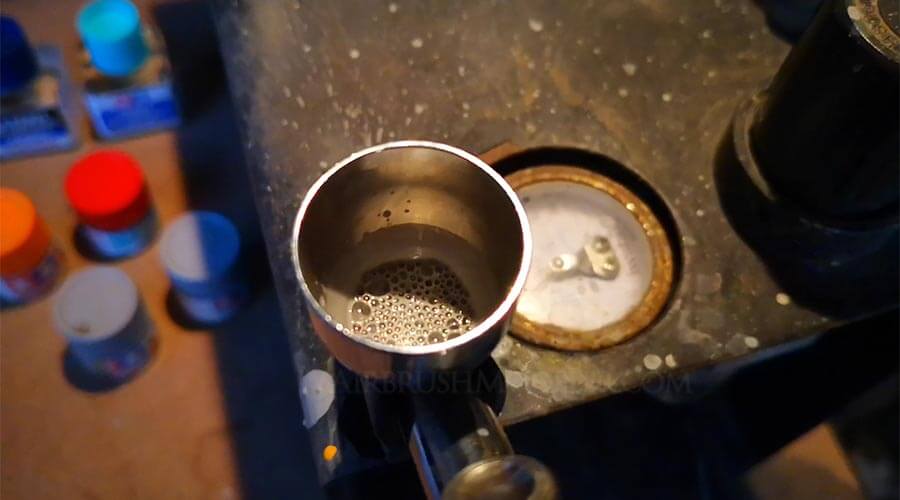
When you’re spraying your paint into the airbrush cup and become reasonably bubbly or frothy sometimes.
This is the gas in the paint reacting to the decanting process and it’s best if you wait for this effect to stop before actually using your airbrush.
If you’ve heard the term ‘gassing out’, this is what people are referring to, waiting for the gas bubbles to fully subside and stop ‘bubbling’ as such.
On a side note, I’ve always found that Tamiya primer has a very much more ‘bubbling’ effect that Tamiya TS spray paints, just something to keep in mind when deciding how full to make your airbrush cup or bottle as you’ll see in the discussion below…
So I’ve found that there are two ways to speed up the process of ‘gassing out’:
Method 1: Mix The Paint
The first is to use a toothpick (or any paint stirrer for that matter) and give the paint a gentle stir.
IMPORTANT: Now bear in mind that when you mix the paint while it’s gassing out it may bubble up dramatically for a second, and I’ve found this to be MUCH more pronounced on primer as opposed to regular coloured paint.
If you’ve put a lot of primer (or paint for that matter) into the cup or bottle you may find that when you give it a stir that the initial flare up of bubbles will overflow and make a mess everywhere.
So again, test with only a small amount of paint or primer on the first occasion so you can get a feel for how the paint reacts to what you’re doing with it.
Method 2: Put Thinners In The Paint
Amazingly enough I find that whether it’s regular Tamiya lacquer paint (TS cans) or Tamiya primer a few drops of thinner will almost entirely stop the gassing out process.
In reality though, use both methods just to be sure.
First I give the paint a very gentle stir using a tooth pick (which I keep handy for when I add thinner), and then I apply a certain amount of thinner to the paint.
Speaking of which, brings us to step six…
Step 6 – Thin The Paint In Your Airbrush
When I’m airbrushing decanted Tamiya TS paints I use a ratio of 3:1 or 4:1, paint to thinners mix.
I typically just eyeball the amount of thinners to put into the decanted paint in the airbrush to get it somewhere within these ratios.
Having said this, if you’re new to decanting spray paint you may be well served by decanting into a small mixing jar first where you can mix in more accurate amounts of thinners before putting the paint into your airbrush for spraying.
👍 For a comprehensive article on thinning Tamiya TS lacquer paint (whether from a decanted spray can or 10 ml jar) click here.
Testing, testing, testing is the key here.
I’ll often use a little more thinners for decanted primer (or primer of any kind unless it’s pre-thinned in a bottle) as it tends to dry a lot more quickly than paint, so the extra thinners helps to provide better and smoother coverage.
🛑 BUT… before you load up the airbrush and go nuts on your prize model…
Step 7 – Do A Test Airbrush Paint On Scrap Plastic Or Card
Whatever the standard PSI is you normally use on your airbrush, leave it on that for now.
Keep everything you do constant other than, of course, the different paint you’re using and testing.
Grab your scrap card or plastic, preferably something flat and fairly rigid regardless of what it is, and start by spraying a quick dot on it to see what result you get…
Is The Paint Too Thin?
If it comes out super wet you know you’ve put too much thinner in, and in this case you’ll have to put more paint into the airbrush to thicken the mixture up.
This is easier said than done…
If you try to decant high pressure paint directly into the airbrush or bottle chances are you’re going to get a spectacular paint explosion, but there is a better way…
Get yourself a paint mixing jar (you can get them very cheaply from Amazon here) and decant the paint into that.
Then simply pour the paint into the airbrush cup or bottle and do a test airbrush spray again until you get it to the perfect consistency for the airbrush job you want.
Is The Paint Too Dry And Perhaps Speckled As It Sprays?
If this is the case then you simply need more thinners, and in the case of primer I find that a ‘little’ more air pressure can sometimes help as well.
Add in extra thinners incrementally and test every time, as if you go too far and add too much thinners it’s much more of a hassle to add more paint than to take the time to adjust your thinners correctly in the first place.
👍 For an in-depth on how to stop your airbrush from spattering and speckling check out this detailed article with 10 methods for fixing the problem right away!
Does The Paint Appear To Airbrush On Perfectly?
Congratulations!
You’ve got no speckling or wet runniness when you airbrush, you’re ready to go!!
First of all take your test card and do a small area spray just to make sure you get good coverage before moving on to your actual model parts or artwork etc.
And if you get good coverage at this stage then you’re good to go!! 👊😎
Is It Mandatory To Thin Decanted Spray Paint In Your Airbrush?
Probably Yes.
Spray cans have been designed with the perfect nozzle and internal pressure to work perfectly with the type of paint inside the can.
When you take that paint and put it in an entirely different spraying device, chances are you’ll get at least slightly different results.
Personally I’ve never been able to decant any kind of spray paint into my airbrush and use it as is, it has always needed some degree of thinning.
I would also recommend using the thinners that is designed specifically for the brand and type of paint you’re using, as in some cases the incorrect thinners can cause problems with your paintwork (I’ve learnt the hard way more than once… 🤬).
👍 As mentioned earlier I have a comprehensive article on thinning Tamiya TS lacquer paint here that’s worth reading if you want all your lacquer thinning questions answered.
However at the end of the day it all comes down to testing.
Always test your airbrush and decanted paint on some test card before every single paint session you’re about to undertake…
…we work FAR too hard on our models and artwork to have it ruined because we didn’t take ten seconds to test spray something disposable first.
NOW… what are some of the problems you might face with the whole decanting process…
Problems With Decanting Spray Paint Into An Airbrush
While this method of using a straw to get paint out of the spray can and into the airbrush is quick, cheap and relatively easy with a little practise, there are a few challenges to be aware of, some of which we’ve touched on…
Straw ‘Cut’ Angle
If you don’t cut the straw at the sharp enough angle you might not get it to fit snugly over the spray can nozzle which will cause quite a mess when you try to spray into the straw.
Additionally, it also means the angle of the straw will be shallow and might not allow the paint to flow into the airbrush cup properly, again possible causing some mess and easily avoided clean-up.
On the flip side, if you cut the straw at too much of an angle, when you apply pressure to the top of the straw to make it seal reasonably well over the nozzle of the spray can it might smother the opening of the nozzle.
This can cause the high pressure paint to squirt out of any little gaps around the top of the straw, again making a lot of mess.
The best bet, start with a 45 degree cut and test it out.
Every straw will be a little bit different given they will have slightly different diameters, and will require different cut angles.
Test with the straws you have until you get it right… practise makes perfect!
Gassing Out Overflow
As mentioned earlier in this article, if you overfill the airbrush cup or bottle the gassing out process of the paint (when it bubbles in the lower pressure outside of the can it was in) can cause it to overflow and make a horrible mess.
This can be quite severe if you stick a toothpick in it and stir and while I wouldn’t call it explosive, it will very rapidly expand out and spill everywhere in no uncertain terms.
A few drops of thinners into your airbrush cup or bottle can alleviate this before stirring with a toothpick, and then moving on to properly thinning the paint ready for airbrushing.
Not Using The Correct Thinners
Do NOT expect that you’ll be able to airbrush decanted spray paint without thinning it.
Sure you might get away with it occasionally with some brands, but the vast majority of the time it simply won’t be ideal, or it may prove pointless with excessive spattering and clogging of your airbrush as the paint will be too thick.
Always use the manufacturer provided thinners for the paint you’re using for best results.
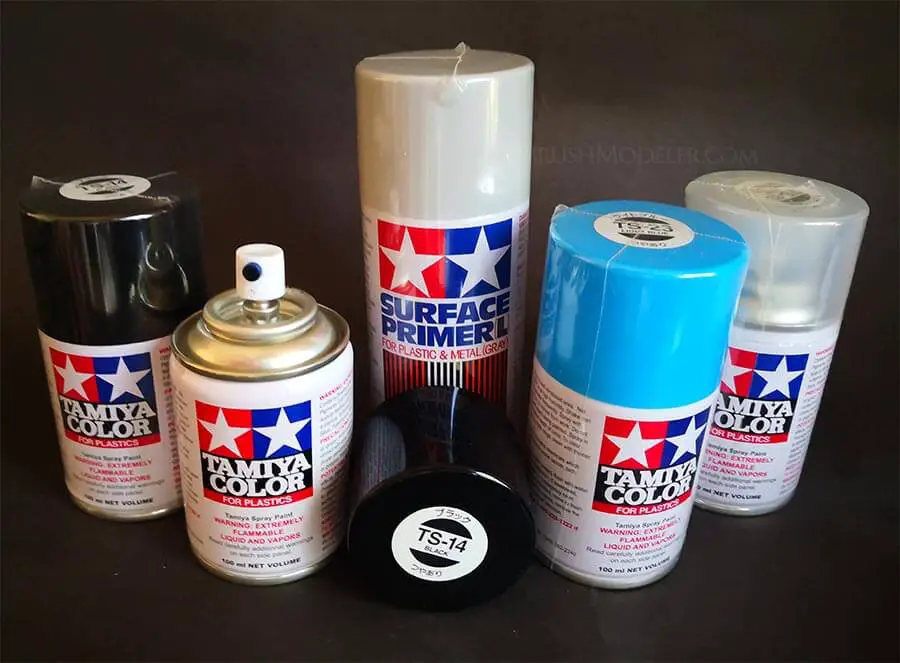
My go to airbrushing paint (that requires decanting) is the Tamiya TS range of paints, and I always use the purpose made Tamiya TS lacquer thinners for properly thinning the paint in the airbrush.
👍 Learn more about expertly thinning Tamiya TS lacquer paint here.
So there you have it, pretty much everything you need to know to get started decanting and airbrushing Tamiya TS lacquer paint.
Give it a shot today, get some practise in something that’s not your best kit initially, and before long you’ll absolutely get the hang of the entire process!
