
A compressor water trap, or moisture trap, is a device attached to a compressor which pulls the moisture out of the air before it is delivered to your airbrush.
This is important because having even tiny amounts of water atomised with the paint as it’s airbrushed onto your model (or any work you’re doing for that matter) have the ability to ruin an otherwise perfect paint job, as we’ll discuss below complete with example pictures.
Typically it water trap will be a small glass bottle situated between the compressor/tank and your airbrush, most often bolted directly to the tank or frame it’s held in.
From there the compressed air hose goes from the water trap to the airbrush itself.
Alternatively, you can get water traps that connect to the bottom of your airbrush and do essentially the same job, the only problem being that the airbrush can be a little unwieldy to operate if the water trap is substantial in size and/or weight.
So if you’ve ever seen the question asked, “how do you stop water from getting into the airbrush while spraying”, the answer is a water trap.
The words water trap, moisture trap and moister filter can be used interchangeably when talking about airbrushing compressors, and for the rest of the article I’ll use the term ‘water trap’.
Do All Compressors Come With A Water Trap?
No.
You will typically need to spend more money to get an airbrushing compressor that has a water trap already installed on the tank, as these types of compressors generally come with many more features overall.
EXAMPLE 1:
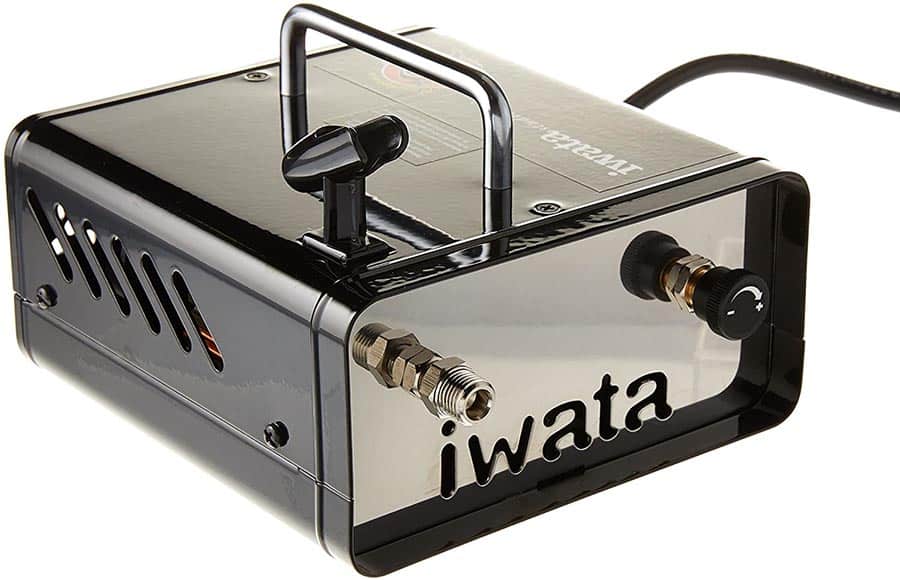
The very capable compressor below is the Iwata-Medea Ninja Jet Single Piston Air Compressor and is available from Amazon for around ~$170 at time of writing. It does not have a water trap but is still a very popular airbrushing compressor none the less with 75 ratings on Amazon with an average of 4 out of 5 stars.
EXAMPLE 2:
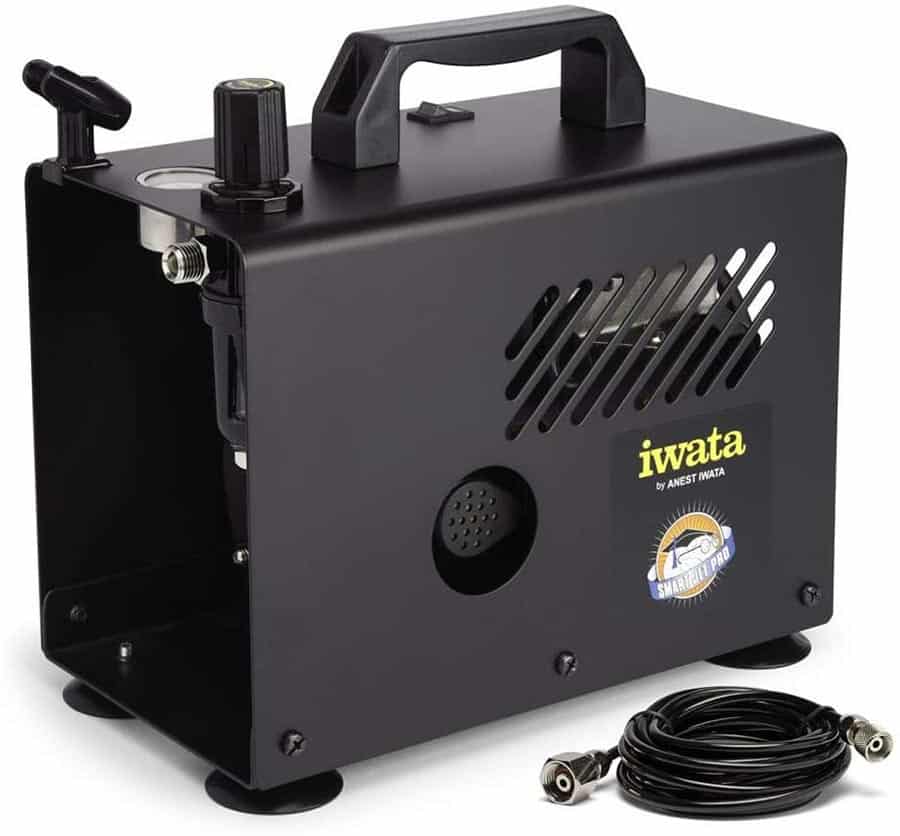
Contrast this to the Iwata-Medea Smart Jet Pro Single Piston Air Compressor complete with compressed air tank and water trap, which is available from Amazon for a little over double the price of the Ninja Series compressor above (at time of writing). Note that this is a MUCH more capable and feature rich compressor and is worthwhile if you intend on doing more than a little casual model building from time to time, or want superior results. It comes with an exceptionally high Amazon rating of 4.8 out of 5 stars.
I’ve personally used one of the above Smart Jet Pro units for fifteen years and it’s still going amazingly strong, I simply cannot fault it. 👍
Can I Install My Own Airbrush Compressor Water Trap?
Yes.
If you’re savvy with this sort of thing it can certainly be done, with some brands making the process relatively simple.
It’s beyond the scope of this article to explain the processes of correctly and safely fitting a water trap to your compressor, however they are readily available to purchase if you wish to give this a go.
EXAMPLE 3:
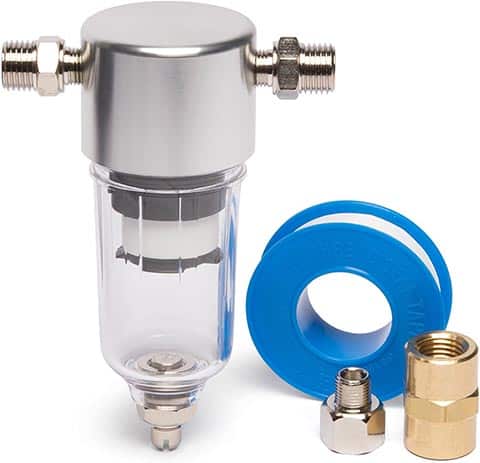
Below is the Iwata DHCL Moisture Filter which uses a high quality five micron filter to remove unwanted moisture particles. It can be attached directly to the compressor or inline between two air hoses, and comes complete with PTFE tamp and various adaptors.
This unit is quite cost effective and you can check out the going price on Amazon by clicking here.
EXAMPLE 4:
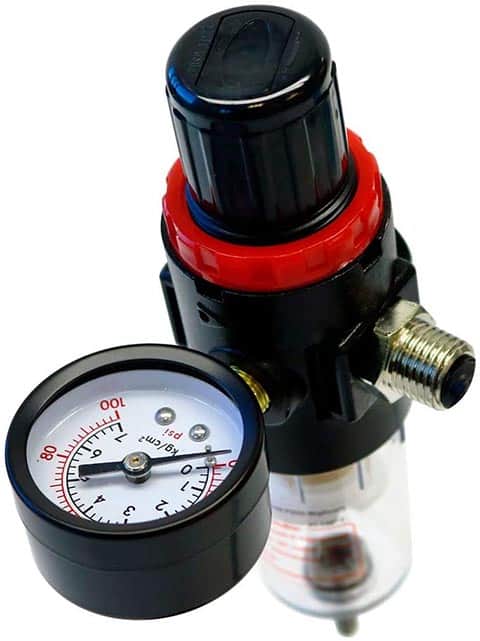
Below is the Paasche R-75 Regulator and Moisture Trap which combines a water trap with an air pressure regulator and gauge for controlling pressures up to 100psi, which should be suitable for most airbrush compressor pressure ranges.
Shipping with standard ¼ inch NPT fittings this is another cost effective option for those of you using a Paasche airbrush/compressor that doesn’t have a gauge fitted. You can check out the current price of this water trap on Amazon by clicking here.
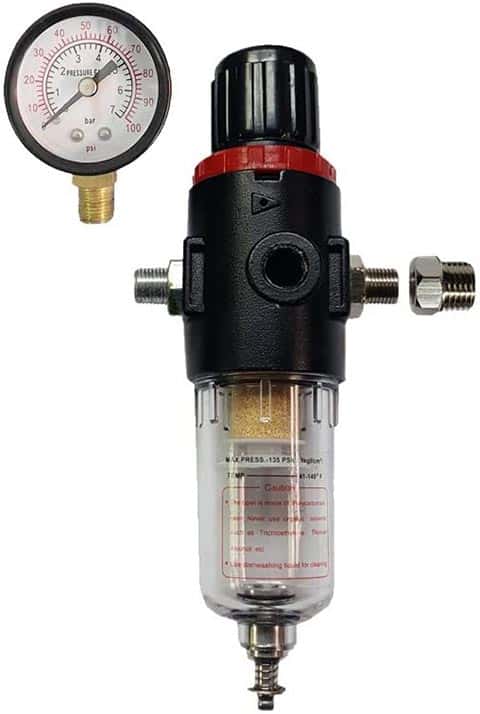
EXAMPLE 5:
The final example here is the Badger 50-054 Air Regulator, Filter and Gauge, for mounting directly to the compressor outlet port. It’s another combination unit like the Paasche above, providing full control of the air pressure but rated to 135psi.
For the latest price on this item check out Amazon by clicking here.
Hang On, Is A Compressor Water Trap Really Necessary?
No.
But…
Your paintwork will become much more susceptible to problems with humidity in the air resulting in water being atomised with your paint when it is being airbrushed.
Having water in your paint in this manner can lead to what’s called fisheyes or humidity spotting, however while these are the same things they can be caused by slightly different things:
- Paint Fisheyes or Paint Dimples: these are small dimples in the paintwork caused by too much moisture in the paint;
- Humidity Spotting: this can cause paint fisheyes if the ambient air you’re spraying in is extremely humid, as you might find in more tropical area or on an extremely wet and rainy day. The high humidity will certainly make the water trap have to work harder, but can also impact the quality of your paint job regardless of the water filter being present as the moisture simply settles into the paint directly from the air.
In the image shown you can see the fisheys or dimples in the paintwork on the 1/24 scale Fujimi Silvia model.
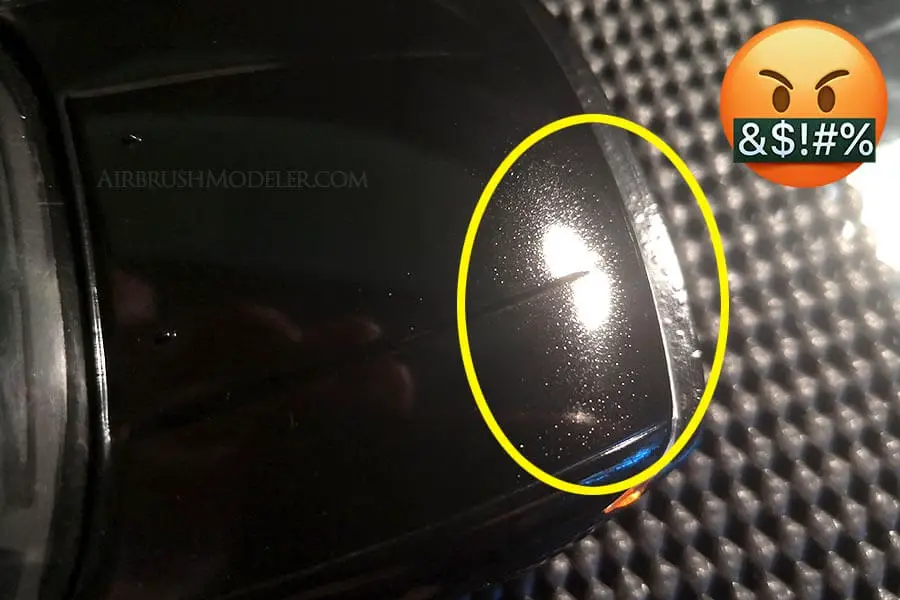
The paint was decanted Tamiya Gloss Black from the TS range, and shot with an airbrush using a compressor fitted with a water trap.
This is my normal setup for all my airbrushing however on the day I sprayed the black top coat it was extremely wet and rainy and the humidity was easy to feel in the air.
It took a day to finally show up, and I went to bed feeling good about what was an excellent top coat of black paint that would polish up very nicely, but woke up the next day to find fisheyes all through it… 🤬
While this result occurred due to high ambient air humidity, you may find that you are much more susceptible to this with lower air humidity if you don’t use a water trap on your compressor.
Be mindful of this when you’re deciding on what compressor to buy and consider what the humidity is like in your own area – the higher the humidity, the greater the need for a water trap on your airbrush compressor. 👍
I Have A Water Trap, Why Am I Still Getting Water In My Paint?
There are a couple of reasons for this:
High Ambient Humidity:
As discussed in the prior section, if you’re airbrushing in very high humidity air as you might find in tropical areas or on a very rainy day, the moisture in the air can affect the paintwork regardless of whether you’re using a water trap or not.
The only way to ensure you don’t experience fisheyes and associated paint problems is to spray when the ambient air isn’t as humid.
High Compressor Temperature
This can be a problem when the moisture trap is attached directly to the compressor (and is perhaps a little more prevalent on smaller compressors), and is a function of temperature and pressure.
When the compressor warms up the water trap warms up also and becomes less able to separate the water from the air passing through it.
The moisture allowed through then condenses from vapour into small liquid water drops in the hose and ultimately mixes with the paint.
The solution here is to ensure your compressor and associated parts are sufficiently cooled, or to simply stop airbrushing for a little while and allow a hot compressor to cool.
So there you have a very quick compressor-water-trap-101 lesson!
Having a water trap to stop moisture mixing with your paint will always be more beneficial over not having one, but if you only do a little casual airbrushing in an environment that’s not overly humid then you should be fine without one.
Happy airbrushing!
